Why position matters as much as force
The point of a chest compression is to squeeze the heart between the sternum (the breastbone) at the front and the spine at the back. The heart sits roughly in the centre of the chest, slightly to the left, with the bulk of its body directly behind the lower half of the sternum. When you press down on the lower sternum, the heart is squeezed; when you release, it refills. The mechanical effect depends on the force being delivered to the right place, in the right direction, with the right contact. G6
Push too high, and you are compressing the upper sternum, which is reinforced by the manubrium and the clavicles — too rigid, and the heart is barely squeezed.
Push too low, and you are compressing the xiphoid process — the small cartilaginous projection at the very bottom of the sternum — which can fracture, drive into the liver, and cause significant injury without any useful cardiac compression.
Push to one side, and you are pressing on ribs rather than the breastbone — risking rib fractures, less force transmission, and a less effective compression.
Push with the wrong contact (the palm, the fingers, the side of the hand), and the force is dispersed over too large or too small an area — bruising the chest wall without compressing the heart.
Get the position right and the technique right, and the compressions are mechanically effective. The position is the foundation that the depth, rate, and recoil sit on.
§ Instructor's note
Hand positioning is one of the easier CPR skills to teach in the classroom and one of the easier ones for learners to forget under stress. The teaching point is that the position is specific — there is a single right place on the chest, and the time to find it is now, not during the call. Drill the rule: centre of the chest, lower half of the breastbone, heel of the dominant hand, other hand on top, fingers off the chest. Six elements, ten seconds, every time.
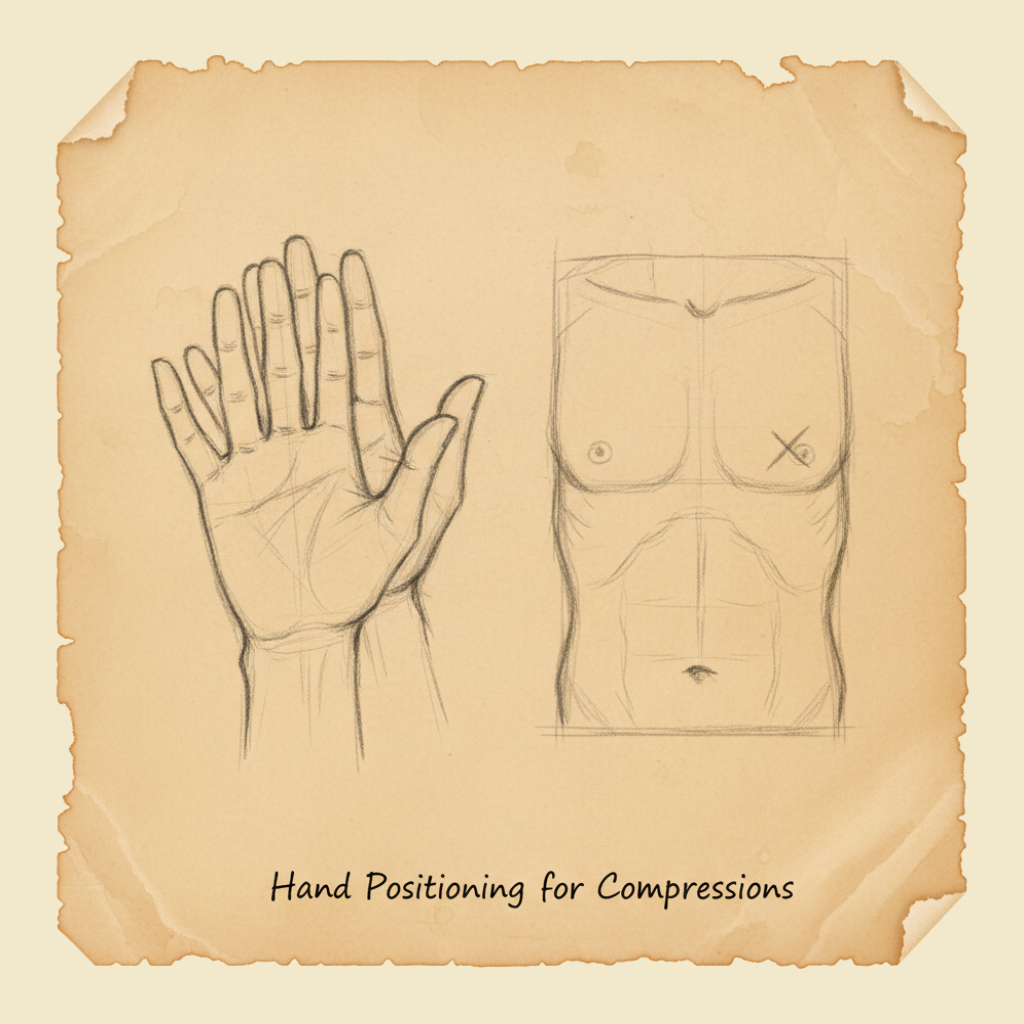
Where to put your hands — the adult position
The standard ANZCOR landmark for adult chest compressions is the lower half of the sternum, in the centre of the chest, between the nipples. The technique:
- Kneel beside the casualty, level with their chest, on a firm surface. (If the casualty is on a soft mattress, slide them onto the floor first; the mattress absorbs the compression force and you cannot generate effective depth.)
- Identify the centre of the chest — visually, it is the midpoint between the casualty's two nipples in an adult, or simply the centre of the breastbone in any anatomy. The exact landmark is "the lower half of the sternum", which corresponds approximately to the lower nipple line in most adults.
- Place the heel of your dominant hand on the lower half of the sternum. The heel of the hand is the fleshy pad just above the wrist, where the bones of the wrist begin. This part of the hand transmits force from your body weight directly through to the chest.
- Place your other hand on top of the first, with the fingers either interlocked with the lower hand or held off the chest. The point is that the only part of you in contact with the casualty's chest is the heel of the lower hand — the fingers should not be pressing on the ribs.
- Position your shoulders directly above your hands, arms straight, elbows locked. This puts your body weight over the compression point and lets you press by rocking from your hips rather than by pushing with your arms.
- Press straight down, vertically, by 5 to 6 cm in an adult. Release fully so the chest recoils.
- Repeat at 100 to 120 compressions per minute (see the compression rate and depth chapter).
The whole position-setup takes about 5 seconds. After the first cycle, you should not need to re-find the position; your hands stay on the chest between compressions, lifting only enough to allow recoil.
What to avoid
A few specific positioning errors are common enough to be worth naming:
- Hands too high. Compressing the upper sternum or the manubrium. Effect: rigid, low-displacement compressions; minimal cardiac compression.
- Hands too low. Compressing over the xiphoid process. Effect: risk of xiphoid fracture, possible liver injury, and minimal cardiac compression.
- Hands to one side of the sternum. Compressing on ribs instead of breastbone. Effect: rib fractures, less force transmission, off-axis compression.
- Pressing with the palm rather than the heel. Effect: force dispersed over a larger area; less depth per unit of effort.
- Pressing with the fingers in contact with the chest. Effect: rib fractures and inefficient force transmission.
- Bent elbows. Effect: arm muscles fatigue quickly and depth drops; you should be using body weight, not arm strength.
- Shoulders not over the hands. Effect: the compression vector is angled, depth is reduced, and the rescuer tires faster.
- Compressing on a soft surface — bed, sofa, beanbag. Effect: the surface absorbs the compression force and the chest is not actually compressed. Move the casualty to a firm surface (the floor) before starting.
The first three errors are about where the hands are; the next three are about how the hands and body are positioned. All six are common in untrained rescuers and all six become much rarer with even brief practice on a manikin.
Children and infants — the position changes with anatomy
The principle of "lower half of the sternum, centred, vertical force, 5–6 cm depth in adult equivalent" carries through to children and infants, with technique changes that reflect the smaller chest size and the reduced force needed.
Children (1 year to puberty)
For a child, the landmark is still the lower half of the sternum. The technique:
- One or two hands, depending on the size of the child and the size of the rescuer. A small child may need only one hand; a larger child or smaller rescuer may need both. Either is acceptable; use whatever combination achieves a depth of about one-third of the chest depth without causing injury.
- One-handed technique: heel of the dominant hand on the lower sternum, the other hand free or stabilising the head. Compress with the body weight on that one arm.
- Two-handed technique: as for adults, with proportionally less force.
- Depth: about 5 cm (or one-third of the chest depth). The depth is relative to the child's chest, not to the adult target.
- Rate: 100–120 per minute, the same as for an adult.
- Ratio: 30:2 for one rescuer, 15:2 for two trained rescuers (see the compression rate and depth chapter).
The single biggest risk in child CPR is under-compressing — the rescuer is so worried about hurting the child that they back off on depth, and the compressions become ineffective. The right depth for a child is about one-third of the chest dimension, and that requires real commitment, even though it is less force than for an adult.
Infants (under 1 year)
For an infant — under one year old — the chest is small enough that the technique changes meaningfully.
- Two-finger technique (one rescuer): place two fingers (typically the index and middle fingers) on the lower half of the sternum, just below the nipple line, and compress by 4 cm or about one-third of the chest depth.
- Two-thumbs encircling-hands technique (two rescuers, more effective when available): place both thumbs side by side on the lower half of the sternum, with the rescuer's hands encircling the infant's chest from underneath. Compress with the thumbs while the encircling hands support the back. This generates more consistent depth than the two-finger method but requires two rescuers and a willingness to handle the infant in this way.
- Depth: 4 cm, or about one-third of the infant's chest depth.
- Rate: 100–120 per minute.
- Ratio: 30:2 for one rescuer, 15:2 for two trained rescuers.
The infant's airway management is also different — neutral head position, not extended — and the rescue breaths use a mouth-to-mouth-and-nose technique because the infant's face is small enough that the rescuer's mouth covers both. Both are covered in the CPR anatomy chapter.
Position transitions during the cycle
Once you have your hands in the right place, they stay there. The transitions during a CPR cycle are:
- Between compressions: hands stay in contact with the chest, lifting just enough to allow full recoil. Do not lift the hands off the chest entirely between compressions — you will lose the position and waste time finding it again.
- Between compressions and breaths: lift your hands off the chest, move to the head, deliver the two breaths through the head-tilt / chin-lift, then return to the chest and find the position again. This transition should take less than 10 seconds for both breaths combined.
- Between rescuers (two-rescuer CPR): the incoming rescuer takes position before the outgoing rescuer steps off. The change should take less than 5 seconds and should happen during the breath cycle so compressions resume immediately.
- For AED analysis or shock: hands and body off the chest entirely, "stand clear", and resume compressions immediately after the AED gives the all-clear.
The principle in all transitions is minimise the time the chest is not being compressed. Every second of pause is a second of brain ischaemia.
If you find a casualty in cardiac arrest on a bed, a sofa, a recliner, an inflatable mattress, or any other soft surface, your first action after the recognition decision is to move them onto a firm surface — usually the floor. The soft surface absorbs the compression force and you cannot generate effective depth no matter how hard you push. The transfer takes about 10 seconds and is part of the response, not optional. Some hospital beds have a "CPR release" lever that drops the back of the bed flat and firms it for resuscitation; outside hospital, the floor is the answer.
Body mechanics — saving yourself for the long run
Hand position is one half of the technique; body mechanics is the other half. Done badly, CPR exhausts the rescuer in under a minute and the depth drops as fatigue sets in. Done well, CPR is sustainable for the two-minute cycle that the rescuer-rotation rule requires.
The principles of efficient body mechanics:
- Kneel close to the casualty, with your knees beside their upper arm and your shoulders above their chest. Do not lean across the casualty — the angle reduces force and increases fatigue.
- Keep your back relatively straight and rock from the hips, not the shoulders. The motion comes from your hip and torso, not your arms.
- Lock your elbows straight so the force transmits directly from your shoulders to your hands without being absorbed by bent joints.
- Use your body weight, not your muscle strength. Rock forward to drive the compression down; allow gravity to do the work.
- Keep your wrists straight and aligned with your forearms so the force drives through the heel of the hand without the wrist having to flex.
- Breathe normally — many rescuers unconsciously hold their breath during compressions, which fatigues them faster. Breathe with the rhythm.
- Pace yourself for the long haul — CPR is a marathon. The rescuer who burns out at one minute is no use to the casualty for the next twenty.
Practical landmark check — the 10-second test
The whole landmark identification and hand placement should take no more than about 10 seconds:
- Expose the chest (cut or remove clothing if needed).
- Identify the centre of the chest between the nipples.
- Place the heel of the dominant hand on the lower half of the sternum.
- Place the other hand on top, fingers interlocked or lifted.
- Position shoulders directly over hands, arms straight.
- Begin compressions.
If you find yourself spending much longer than this on the setup, you are losing time the casualty needs. The setup is a single fluid sequence, not six separate steps to be checked off — and it should feel that way after even a single classroom rehearsal.
Many rescuers hesitate to expose a casualty's chest, particularly a female casualty in a public place. The hesitation is understandable but it costs time the casualty cannot afford. Cut or pull the clothing aside, do the compressions, and ask a bystander to drape something over the casualty if modesty is a concern. The casualty's life takes priority; modesty is a problem you can solve after they survive. AED pads also need direct skin contact (see the AED use chapter) — the chest is being exposed either way.
Chest compressions for an adult should be performed with the heel of one hand placed on the lower half of the sternum, in the centre of the chest, with the other hand placed on top. The rescuer's shoulders should be directly above the casualty's chest, with the arms straight and elbows locked, allowing the rescuer's body weight to deliver the compression. The depth should be 5 to 6 cm with full chest recoil between compressions. For children, one or two hands may be used depending on the rescuer's size and the child's chest dimensions. For infants, the two-finger technique (one rescuer) or the two-thumb encircling-hands technique (two rescuers) is recommended.
What not to do
- Do not compress over the upper sternum or the xiphoid process. Stay on the lower half.
- Do not press with the palm or fingers — heel of the hand only.
- Do not bend your elbows. Lock them straight.
- Do not kneel too far from the casualty. Get close, with your shoulders above their chest.
- Do not lean across the casualty at an angle. Vertical force, vertical body position.
- Do not compress on a soft surface. Move the casualty to the floor.
- Do not lift your hands off the chest between compressions — keep them in contact, lift only enough for recoil.
- Do not waste time on perfect landmark identification. Centre of the chest, lower half of the sternum, start compressions.
You will rehearse the hand-position setup on a manikin until the entire sequence — kneel, identify landmark, place hand, top hand, shoulders over hands, start compressions — feels like a single fluid action. You will also rehearse the same for a child manikin and an infant manikin, using the appropriate technique for each. The position is the kind of muscle memory that takes minutes to learn and years to forget; the time to learn it is now, not during a call.
CPR is a precision tool in disguise. The hands have to go in a very specific place, in a very specific way, for the force you generate to actually compress the heart. Centre of the chest, lower half of the sternum, heel of the hand, shoulders above. Six things, ten seconds, every time. Get the position right and the rest of the technique can do its job.
— ANZCOR Guideline 6 (Compressions)